

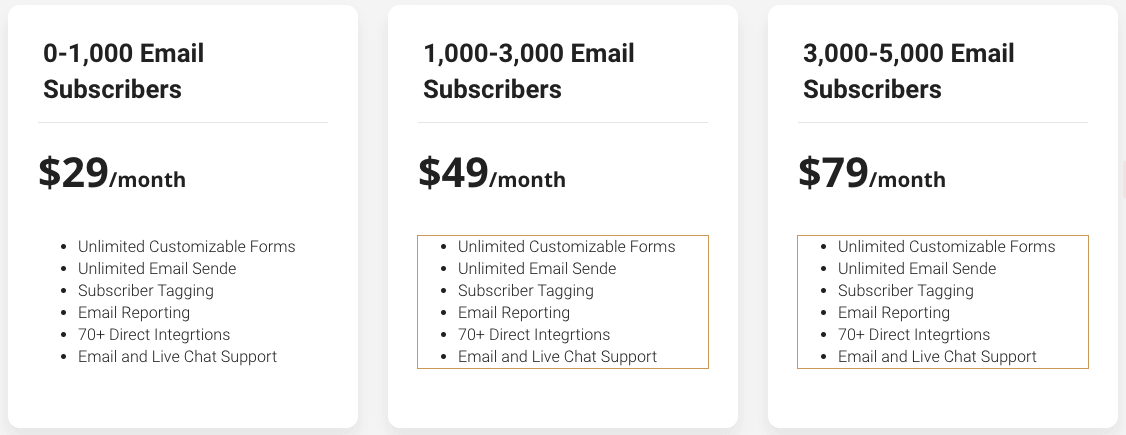
If you are looking for ConvertKit pricing, you are in the right place. The table below shows how much ConvertKit costs and the ConvertKit price plan.
CONVERTKIT IS NOW FREE TO JOIN!
The Free plan includes:
- Unlimited landing pages
- Unlimited, customizable CTAs & signup forms
- 80+ premium landing page templates
- Unlimited traffic
- Customizable domain setup
- Mobile responsive designs
- Manage 500 subscribers
- Email broadcasts
- Subscriber tagging
- Seamless Unsplash integration
- Creator community
As you can see the entry-level product for $29 per month allows you to have up to 1,000 email subscribers, be able to send unlimited emails per month. What you also get is access to all ConvertKit features for the one monthly price.
Quick disclaimer – this review does contain affiliate links to products that I recommend. I only recommend products that I have used and that I think could be beneficial to your business. I receive a small commission if you click on any of the links and sign up for the product or service, but that doesn’t increase the price and may sometimes include special discounts.
There are higher levels available for people with larger email lists, but it is one of the more affordable email autoresponders.
ConvertKit also has a concierge service to help with migration of larger lists.
Click here to join ConvertKit for free

Why Buy ConvertKit?
Having an email list is one of the most important assets any business can have. If you talk to any successful entrepreneur they will say that their email list is their most important asset.
If you are looking to build an email list, you need the best software to manage those emails and ensure they receive the correct email at the right time. Setting up automated email sequences can allow your business to run on autopilot.
With ConvertKit you have powerful email sequence builders to ensure you keep in regular contact with your email list, automatically.
ConvertKit is designed to automate the management of your email subscribers and it does an excellent job.
Once you have collected your email subscribers, you can segment them within ConvertKit and add them to specific email sequences depending on their interests.
You can segment your email list according to their actions. If they open specific emails, click links or make a purchase, they can be added to or removed from a particular sequence.
Once set up, you can correspond with your subscribers on autopilot.
![]()
What is included in the ConvertKit pricing?
For those of you that haven’t heard of ConvertKit, it is an email automation software tools designed specifically for online businesses that use email for marketing and sales.
If you are in the early stages of building your email list and you don’t want an email automation tool that is overly complicated, ConvertKit is an excellent choice. I used it to manage my email list when I was just getting started. I didnt want to spend a fortune and I wanted something that was easy to use.
Click here to join ConvertKit for free
What Else Do You Need To Buy?
In order to capture email subscribers, you also need landing page software. This will allow you to design pages specifically aimed at capturing visitors email addresses. If you want to save some money while you build your income, ConvertKit does include a basic landing page builder.
If you prefer to use a dedicated landing page software tool, I recommend Leadpages. It costs $37 per month (or $25 per month if paid annually) and is one of the easiest page design tools I have used.
Click here for a Leadpages free trial

Kartra – A fully integrated marketing software suite
If you are serious about building an online business and just want to learn one software tool, I recommend Kartra. This is what I currently use to run my marketing. It is a little more expensive than ConvertKit and Leadpages at $79 per month (annual payment) or $99 per month (pay monthly), but it is literally the only piece of software you need. Please visit my Kartra page to learn more. The page is designed using Kartra so you can get a feel for what it can do.

ConvertKit Pricing – Conclusion
So to summarize, if you are on a limited budget and looking for a great piece of software to manage your email list, ConvertKit at $29 per month is priced competitively against other email automation tools.
It also has the advantage that it is very easy to use. Because it was designed from the ground up to manage email lists, it does the job very well.
It doesn’t have some of the bells and whistles of other email automation tools, but that can be a good thing if you don’t have a lot of time to learn a new product.
If you are just embarking on building your email list, I recommend you try ConvertKit.
Click here to join ConvertKit for free
Bonus – ConvertKit Guide to Migrating from another Email Provider
courtesy of ConvertKit
Switching email providers is a pain, and we want to alleviate as much of that pain as possible so you can move over to ConvertKit seamlessly and quickly.
To start you off on the right foot, here’s a quick checklist, showing the steps you need to take.
ConvertKit’s Quick Migration Checklist
- Map your funnels.
- Replicate the subscriber forms and sources.
- Copy sequences. (other platforms may call “campaigns”)
- Match sequences to forms and tags.
- Replicate any automation (product purchases, etc).
- Replicate tags in CK to match lists/tags in
old provider. - Create new segments in CK.
- Switch blog forms and subscriber sources to CK forms.
- Import subscribers to match tags in CK.
- Send broadcast!
Let’s cover each one individually, and then we’ll also point out some of the main ways ConvertKit features differ from other providers. Reading this is also a great way to understand the core functions of the feature set, and how to get started in the best way.
Mapping the Funnel
We start here because understanding the funnel subscribers go through is what we are re-creating in the big picture. You may not think you even have a funnel, but you do. Here’s what we mean:
Basic Opt-in Funnel
- A subscriber opts-in through the sidebar form or landing page opt-in
- Optional “thank you” page.
- Receives confirmation email.
- Optional content upgrade via file or
URL link.
- Optional content upgrade via file or
- It begins the follow-up sequence (also optional).
- Added to the
Newsletter segment.
Basic Product Funnel
- Someone buys your product.
- They are given a “buyer” tag.
- Optional follow-up sequence.
- Added to “buyer” segment
Basic Content Upgrade Funnel
- A subscriber opts into your content upgrade form to get free content.
- Optional “thank you” page.
- The
subscriber receives aconfirmation email. A c ontent upgrade provided to the subscriber via file orURL link.- Optional follow-up sequence.
- Added to the
Newsletter segment.
Basically, each new subscriber or customer goes through a specific funnel, and we need to know what they are.
To help clarify the funnels ConvertKit created a spreadsheet that lays everything out. If you want to speed up your migration, fill out this sheet with each form and subscriber source on your site. Click here to view.
This is a public Google Sheet, so you need to make a copy of your funnels.
The next step is diving into the main point of entry for any new subscriber. Forms.
Forms
Forms are the lifeblood of your ConvertKit account. Each new subscriber will come through a form and can be organized there for sequences, broadcasts, or sales pitches. For the purpose of this guide, we’ll use forms to describe landing pages too, since they operate the same way.
A common misconception of forms is you need to use an automation rule to add subscribers to your imported Newsletter tag. That’s not the case. You can create a segment that gathers subscribers in all applicable forms and tags. For a more in-depth explanation of segments, click here.
For each subscriber source funnel, you will create a specific form to start readers on their journey.
Replicating Forms and Sources
You can replicate your brand colors and calls to action for the form, but there are some style limitations.
Our forms look great and convert well, but they are not custom forms, just like the forms you were using with your old provider were not “out-of-the-box”. If you want a lot of style options (fonts, colors, icons) and layouts, you’re best off using a lead gen form builder like SumoMe, Thrive Leads, or Optin Monster.
Let’s talk about these services since many people use them! You still need to create a form to “catch” the subscribers in ConvertKit. What you don’t need to worry about when connecting with a lead-generating service is the designed content of the ConvertKit form. Colors and text don’t matter, that’s what Optin Monster is for. You only need to match the fields (first name, email) in the ConvertKit form with the fields you’re requesting with the service.
Quick note: you don’t necessarily need to create specific forms to connect with the lead gen service. If they are going through the same funnel that is set up with another form, you can use it here too.
Next, in Forms are the settings, and it’s just a quick overview. You can connect a sequence to a form directly in the settings by selecting it from the drop-down menu. Most of the time, we choose to make it mandatory for new subscribers. You can also start a sequence on a specific date if you like, more on that here.
There is a default “Thank You” page in ConvertKit, but we highly recommend using a page on your own site to stay consistent. This can be selected as the Success Redirect URL in the form’s main settings.
If you have a single email welcome message or content upgrade, it will be delivered through an Incentive Email. This is a great way to grow your list and deliver specific upgrades to posts and pages. Once a reader clicks the Confirm Subscription button, the upgrade can be delivered in one of two ways.
1. File Download: We simply upload the file in the action box below the email text. Easy!
2. Success URL: Click on the URL button next to the upload file option. The option will flip and we will paste the URL there. A great option for existing content you want to keep leveraging.!
Let’s move on to Sequences.
Sequences
Whatever (MailChimp) automation, (Aweber) autoresponders, or (Infusionsoft) campaigns you have, it’s almost always a matter of copy and paste. The process is not hard but can be tedious depending on the number of sequences that need to be migrated.
A couple of things to take note of.
- ConvertKit schedules sequences based on days since t
he last email. MailChimp and Aweber do the same, just match the schedules. - The ConvertKit email template and editor can handle header images, inline images, and hyperlinks. What it doesn’t handle well (nor plans to), are heavily styled templates that include different tables and sidebars.
We find that emails deliver better and have higher engagement when they are written like emails to friends, not when they look like mini-web pages. A more in-depth explanation is here.
Match sequences to forms and sources.
Once the sequences are migrated, they can be connected to forms in the settings, or to other tags and sequences with automation rules. For example:
- Reader subscribes to form, starts a sequence.
- A person buys a product on Gumroad, starts a sequence specifically for buyers.
- A reader in your pitch sequence buys the product, and is taken off the pitch sequence and added to the buyer sequence.
Automation
Automations are how you keep subscribers moving through the different sections of their journey. A few examples are:
- A subscriber buys a product (on Gumroad, Shopify, Teachable) and has a “buyer” tag added.
- A subscriber clicks the “Buy Now” link trigger, has an “Interest” tag added.
- A subscriber completes one sequence, is added to a new sequence.
If you’re coming from MailChimp or Aweber, you probably don’t have any, and that’s one reason you’re coming to ConvertKit!
Replicate Old Lists as Tags in ConvertKit
Each list in your old provider will become a tag in ConvertKit. We simply copy the old list name to the new tag, export the data, and import to the matching tag in ConvertKit. That’s all!
Of course, that’s easy for 5 lists or tags. The more lists, the more tedious and time consuming the process becomes. If you can consolidate your tags, this is the time to do it!
Create Subscriber Segments
We referenced this in the Form process, but subscriber organization works much differently on ConvertKit than other services. ConvertKit is a subscriber-focused system, while MailChimp and Aweber (along with most others) are list-based systems. For a more in-depth explanation of segments, click here.
The TL, DR version is that you can create segments that combine tags and forms to target subscribers. Here are a few examples:
- A Newsletter segment includes blog forms, imported subscriber tags, and buyer tags (if you want).
- A Buyer segment includes any forms or tags for subscribers who have purchased from you.
- A Student segment includes all the tags from people who have bought Teachable courses.
- A Member segment includes all the tags from people who are a part of your membership community.
Because of segments, you don’t have to create a ton of automation rules to move form subscribers to tags, or click a bunch of tags and forms when it’s time to send a broadcast. They’re just in a segment!
Think of segments as different buckets that forms, landing pages, and tags are dropped into. Here’s a quick visual sketch of the idea.
Of course, in ConvertKit you are not charged for duplicate subscribers, because they literally don’t exist. You don’t have people on multiple lists, each one exists as a subscriber with different tags, forms of entry, and sequences completed. But they are still just one person.
Switch blog forms and subscriber sources to CK forms
Now you will go to each form on your blog and switch it to the new ConvertKit form. Do the same for each source with a lead gen tool (LeadPages, Optin Monster, SumoMe). If you’re simply using WordPress and ConvertKit forms, please read this KB article. You can find the instructions for other services we integrate within the KB as well.
This is where your funnel map is very useful. Simply go down the list and start checking them off!
Subscriber Import
This is the last step, even though it’s fairly easy. The reason we wait until the end to import is so we don’t miss anyone in the process of switching everything.
For example, a reader opts in at the sidebar form, receives a free workout schedule (incentive), and begins the free weekly workout sequence. We need to have that in place before switching the web form from the old provider to ConvertKit.
Switching the web forms to ConvertKit is essentially turning off the subscriber flow to your old provider. Now we know the lists are accurate and it’s safe to import them to ConvertKit.